How to Record YouTube Videos on Any Device in 2026: The Ultimate Guide
On this page
Whether you’re creating a tutorial, capturing a gameplay session, or sharing a personal story, knowing how to record YouTube videos is a valuable skill. This guide provides step-by-step instructions for capturing footage on different devices, helping you get started on creating your next YouTube masterpiece.
How to Record YouTube Videos on a PC
This section will detail how to record YouTube videos on a PC using both built-in and third-party software.
Using Built-in Screen Recording Tools (Xbox Game Bar):
The Xbox Game Bar is a convenient option for capturing basic screen recordings on Windows 10 and 11. Here’s a step-by-step guide:
- Open the application or window you want to record. This could be your web browser playing a YouTube video, a game you want to capture gameplay of, or any other program on your screen.
- Launch the Xbox Game Bar. Press the Windows logo key + G on your keyboard simultaneously. You might see a pop-up asking if you want to allow access to game features. Click “Yes.”
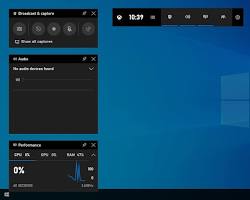
- Start Recording. Click the red circle button labeled “Capture” in the Xbox Game Bar menu.
- Optional: Record Microphone Audio. If you want to narrate your recording, click the microphone icon next to the capture button to enable it.
- Stop Recording. Once you’re finished capturing your screen, click the red square button labeled “Stop” in the Xbox Game Bar.
- Access Your Recording. The recording will be saved as an MP4 file in the “Videos” folder > “Captures” subfolder by default. You can access this folder through your File Explorer.
Limitations of Xbox Game Bar:
- Offers minimal customization options.
- Primarily designed for capturing games.
Using Third-Party Screen Recording Software:
Third-party software provides more features and control over your recordings. Here’s a breakdown of popular options:
- OBS Studio (Free and Open Source): Powerful and versatile software with a learning curve. Great for advanced users and streamers.

- **ShareX (Free):**User-friendly and lightweight option with basic editing tools.

- **Fraps (Paid):**Primarily designed for recording gameplay with performance tracking features.

Each software has its own installation and setup process. It’s recommended to refer to the specific software’s documentation for detailed instructions. However, the general recording process often follows a similar flow:
- Download and install your chosen software.
- Launch the software and familiarize yourself with the interface.
- Configure recording settings. This typically involves specifying the recording area (entire screen, specific window, etc.), audio source (microphone, system audio, or both), and output format/quality.
- Start recording. Locate the recording button within the software’s interface.
- Stop recording. Once finished, use the designated stop button within the software.
- Access and edit your recording. The software might offer basic editing tools or allow exporting the recording for further editing in a separate video editing program.
Remember, these are general steps. Always refer to the specific software’s instructions for detailed guidance. By following these steps and exploring the features of your chosen software, you can create high-quality screen recordings for your YouTube videos.
How to Record YouTube Videos on a Mac
This section dives into capturing YouTube videos on a Mac using both QuickTime Player, the built-in option, and third-party software.
Using QuickTime Player:
QuickTime Player offers a straightforward way to record your screen on Mac. Here’s how to use it:
- Open QuickTime Player. You can find it in the Applications folder.
- Start a New Screen Recording. Go to the “File” menu and select “New Screen Recording.”
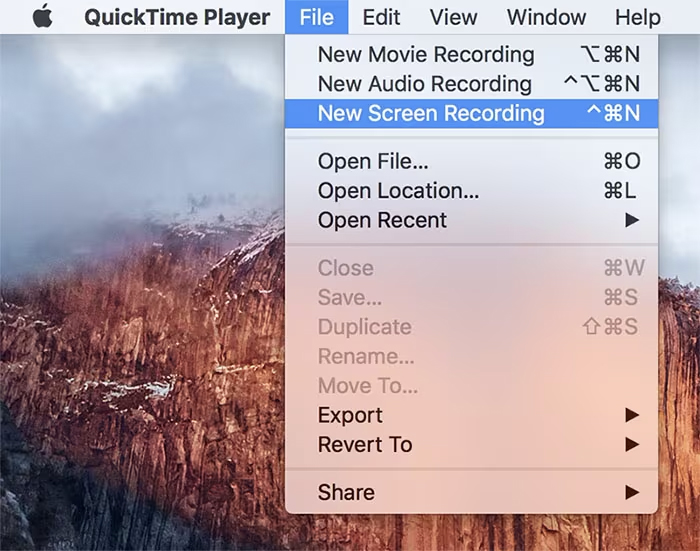
- Configure Recording Options (Optional). Click the down arrow next to the record button. This allows you to choose the recording area (entire screen or a specific window) and enable microphone recording if you want to narrate.
- Begin Recording. Click the red record button.
- Stop Recording. When finished, click the red square stop button in the menu bar or press Command + Option + Escape (Esc).
- Save Your Recording. A window will appear prompting you to save the recording. Choose a filename, location, and click “Save.”
Limitations of QuickTime Player:
- Lacks advanced features like editing tools or multiple audio source selection.
Using Third-Party Screen Recording Software:
Third-party software provides more robust functionality for recording and editing your Mac screen captures. Here are some popular options:
- **ScreenFlow:**User-friendly interface with editing tools and annotations.

- **Camtasia:**Powerful software with advanced editing features, ideal for professional use.

- **Apowersoft ApowerREC:**Feature-rich option with screen recording, audio recording, and basic editing capabilities.

The installation and setup process will vary depending on the chosen software. Refer to the software’s documentation for detailed instructions. However, the general recording workflow often follows these steps:
- Download and install your preferred software.
- Launch the software and explore the interface.
- Configure recording settings. This typically involves specifying the recording area, audio source, and output format/quality.
- Start recording. Locate the recording button within the software’s interface.
- Stop recording. Once finished, use the designated stop button within the software.
- Access and edit your recording. The software might offer built-in editing tools or allow exporting the recording for further editing in a separate video editing program.
Remember, these are general steps. Always consult the specific software’s instructions for detailed guidance. By following these steps and exploring the features of your chosen software, you can create professional-looking screen recordings for your YouTube videos on your Mac.
How to Record YouTube Videos on an iPhone
This section will guide you through capturing footage for your YouTube videos directly on your iPhone. We’ll explore both the built-in screen recording feature and third-party app options.
Using the Built-in Screen Recording Feature:
iPhones come equipped with a handy screen recording feature accessible through the Control Center. Here’s how to use it:
- Access the Control Center. Swipe down from the top right corner of your screen (iPhone X and later) or swipe up from the bottom of the screen (iPhone 8 and earlier).
.jpeg)
- Locate the Screen Recording icon. It might look like a circle with a dot inside.
- Long press the Screen Recording icon (optional). This might reveal additional options like enabling microphone audio for narration.
- Start recording. If you didn’t long-press the icon in step 3, tapping it will initiate a 3-second countdown before recording begins.
- Wait for the countdown to finish. The screen recording will start automatically.
- Stop recording. A red bar will appear at the top of your screen while recording. Tap this red bar or swipe up from the bottom and tap the red record button within the Control Center to stop recording.
- Access your recording. The recording will be saved as a video file in the Photos app. You can find it in the “Recently Added” album.
Limitations of Built-in Screen Recording:
- Lacks editing tools within the feature itself.
Using Third-Party Screen Recording Apps:
The App Store offers a variety of third-party screen recording apps with features beyond basic recording. Here are some popular choices:
- **InShot (Free with in-app purchases):**Offers basic editing tools and the ability to add music and text to your recordings.

- **Mobizen Screen Recorder (Free):**Provides features like screen drawing and front camera recording during screen capture.

- **Apowersoft ApowerREC (Free with in-app purchases):**Feature-rich app with editing tools, live streaming capabilities, and video trimming options.
Downloading and installing these apps is straightforward through the App Store. Each app will have its own user interface and settings. It’s recommended to consult the app’s specific instructions or in-app help guide for detailed recording procedures.
In general, the recording process with third-party apps often follows a similar flow:
- Launch the screen recording app.
- Explore the app’s interface and settings. Familiarize yourself with the recording controls and available options.
- Configure recording settings (optional). This might involve specifying the recording area, audio source, resolution, and frame rate.
- Start recording. Locate the record button within the app’s interface.
- Stop recording. Once finished, use the designated stop button within the app.
- Access and edit your recording. Third-party apps often offer built-in editing tools or allow exporting the recording for further editing in a separate video editing program.
By following these steps and exploring the features of your chosen app, you can capture and enhance screen recordings for your YouTube videos on your iPhone.
How to Record YouTube Videos on an Android Device
Capturing footage for your YouTube videos is possible directly on your Android device. This section will show you how to use the built-in screen recorder and explore third-party app options.
Using the Built-in Screen Recording Feature (Android 11 or Later):
The good news is that many Android devices running Android 11 or later have a built-in screen recording feature readily available. Here’s how to access it:
- Swipe down twice from the top of your screen. This opens the Quick Settings menu.pen_spark
- Locate the Screen Recorder icon. You might need to swipe left or right to find it depending on your device model.
- Tap the Screen Recorder icon. This might initiate a short countdown before recording begins.
- Optional: Configure recording options (if available). Some devices allow you to choose the recording quality, enable microphone audio, or show screen touches during recording. Tap the settings icon within the Screen Recorder tile to see these options (if applicable).
- Start recording. A notification will appear indicating that recording has started.
- Stop recording. Look for the notification or a stop button within the Screen Recorder tile in the Quick Settings menu. Tapping this will stop the recording.
- Access your recording. The location of your saved recording might vary depending on your device. It’s typically found in the “Videos” or “Screen Recordings” folder within your device’s storage. You can access this folder through your Files app.
Limitations of Built-in Screen Recorder:
- Feature availability depends on your device model and Android version.
- Recording options might be limited compared to third-party apps.
Using Third-Party Screen Recording Apps:
The Google Play Store offers a vast selection of screen recording apps with a wider range of features and customization options. Here are some popular choices:
- **AZ Screen Recorder:**Free app with basic editing tools and screen drawing capabilities.

- **Mobizen Screen Recorder:**Free app with recording resolution options and the ability to record the front camera simultaneously.
- **Super Screen Recorder:**Free app with features like countdown timers and live streaming capabilities (paid upgrade required).

Downloading and installing these apps is straightforward through the Google Play Store. Each app will have its own user interface and settings. It’s recommended to consult the app’s specific instructions or in-app help guide for detailed recording procedures.
In general, the recording process with third-party apps often follows a similar flow:
- Launch the screen recording app.
- Explore the app’s interface and settings. Familiarize yourself with the recording controls and available options.
- Configure recording settings (optional). This might involve specifying the recording area, audio source, resolution, and frame rate.
- Start recording. Locate the record button within the app’s interface.
- Stop recording. Once finished, use the designated stop button within the app.
- Access and edit your recording (optional). Some apps offer basic editing tools within the app, while others allow exporting the recording for further editing in a separate video editing program.
By following these steps and exploring the features of your chosen app, you can unlock more recording flexibility for your YouTube videos on your Android device.
Built-in Recording Tools vs. Third-Party Software
When it comes to recording YouTube videos, you have the choice between using the built-in screen recording features on your device or exploring third-party software options. Here’s a breakdown of the advantages and disadvantages of each approach:
Built-in Recording Tools:
Advantages:
- Convenience: They’re readily available on your device, eliminating the need for downloads or installations.
- Simplicity: They often have a user-friendly interface with minimal configuration required.
- Free: You don’t need to pay anything to use them.
Disadvantages:
- Limited Features: Built-in tools typically offer basic recording functionality with minimal customization options.
- Editing Limitations: Editing capabilities are often limited or non-existent within the recording tool itself.
- Lower Quality: Recording resolution and frame rate options might be restricted compared to third-party software.
Third-Party Recording Software:
Advantages:
- Feature Rich: Third-party software offers a wider range of features, allowing you to customize recording settings, add annotations or overlays, and include features like webcam recording.
- Editing Capabilities: Many third-party options have built-in editing tools or allow exporting recordings for further editing in dedicated video editing software.
- Higher Quality: You can often choose higher recording resolutions and frame rates for sharper visuals.
Disadvantages:
- Learning Curve: Some software can have a steeper learning curve compared to the simplicity of built-in tools.
- Cost: While many free options exist, some popular third-party software requires a paid subscription to unlock all features.
- Compatibility: Ensure the software is compatible with your device’s operating system.
Recording YouTube Videos for Free
Absolutely! You can leverage the built-in recording features on most PCs, Macs, iPhones, and Android devices to capture footage for your YouTube videos. There are also many free third-party screen recording apps available. However, keep in mind these limitations of free methods:
- Basic Features: Free options might have limitations on recording time, resolution, or features like editing tools.
- Watermarks: Some free software adds watermarks to your recordings, which might not be ideal for your YouTube videos.
- Functionality Restrictions: Free versions might restrict access to advanced features available in paid subscriptions of the same software.
Comparison of Popular Screen Recording Software
Screen Recording Software Comparison
Comparison of Popular Screen Recording Software
| Software | Features | Pros | Cons | Price |
|---|---|---|---|---|
| OBS Studio (PC & Mac) | Highly customizable recording settings, live streaming, multi-source recording, free and open-source | Powerful, excellent for advanced users, free | Steeper learning curve | Free |
| ShareX (PC) | Simple interface, screenshots, basic editing, free and open-source | User-friendly, lightweight, good for quick captures | Limited editing features | Free |
| Fraps (PC) | Gameplay recording, performance overlay (FPS counter), benchmarks | Excellent for gameplay with performance tracking | Paid software, limited features outside of gameplay | Paid |
| Camtasia (Mac & PC) | Extensive editing tools, screen annotations, asset library, intuitive interface | User-friendly, powerful editing, professional results | Paid software, steeper learning curve for advanced editing | Paid |
| ScreenFlow (Mac) | Intuitive interface, built-in editing, annotations, optional iOS recording | User-friendly, good for quick edits, optional iOS recording | Paid software, limited advanced editing features | Paid |
| Apowersoft ApowerREC (PC & Mac) | Feature-rich, screen & webcam recording, audio recording, basic editing, live streaming | Affordable, various recording options | Can feel bloated, might be more than some users need | Freemium |
Best Practices for Recording YouTube Videos: Pro Tips and Troubleshooting
Creating engaging YouTube videos involves more than just hitting record. This section dives into common issues, legal considerations, recording quality optimization, and best practices to elevate your YouTube content.
Common Issues and Troubleshooting:
- Grainy or pixelated recordings: This could indicate insufficient recording resolution settings. Check your software or device’s recording settings and ensure you’re recording at a high enough resolution (like 1080p or higher). A slow internet connection can also cause pixelation during uploads, so a stable internet connection is crucial.
- Shaky footage: Invest in a tripod or phone stand to stabilize your camera and prevent shaky recordings.
- Poor audio quality: Ensure your microphone is properly connected and selected in your recording software settings. If using a built-in microphone, consider using an external microphone for better sound quality. Also, record in a quiet environment to minimize background noise.
- Watermarks on recordings: These typically come from third-party recording software. If unwanted, try using the built-in recording features on your device (PC, Mac, iPhone, Android) or consider free screen recording software without watermarks (research reputable options carefully).
Legal Considerations: Copyright and Fair Use
- Copyright: Copyright protects original creative works. Using copyrighted material in your videos without permission from the copyright holder can result in copyright strikes or even removal of your video.
- Fair Use: Fair use allows limited use of copyrighted material for purposes like commentary, criticism, education, or news reporting. However, fair use is a complex legal concept, and what constitutes fair use depends on various factors. It’s always safest to err on the side of caution and use copyright-free content whenever possible. Here are some resources to learn more about copyright and fair use:
- U.S. Copyright Office: https://www.copyright.gov/
- Fair Use Overview: https://fairuse.stanford.edu/
Optimizing Recording Quality
- Adjust Recording Settings: Most screen recording software and device settings allow you to adjust the recording resolution (e.g., 720p, 1080p), frame rate (generally higher is smoother), and bitrate (affects file size and quality). A good balance between quality and file size is important. Consult your software’s documentation for recommended settings.
- Stable Internet Connection: A strong and stable internet connection is crucial for smooth recording, especially for high-resolution recordings. Uploading large video files also requires a good internet connection.
- Lighting and Audio: Good lighting is essential for clear visuals. If possible, record in a well-lit environment or use additional lighting. For audio, use a good microphone and record in a quiet space to minimize background noise.
General Best Practices:
- Plan Your Content: Having a clear idea of what you want to create will streamline the recording process.
- Script or Outline: Scripting your video helps maintain focus and ensures you cover all the important points.
- Practice Makes Perfect: Do a practice recording to check your setup, lighting, audio, and overall flow before hitting record for the final video.
- Edit for Clarity and Flow: Editing allows you to remove unnecessary pauses, add transitions, and polish your video for a professional look. Many screen recording software options or free editing software offer basic editing tools.
By following these best practices and troubleshooting tips, you can overcome common challenges and create high-quality YouTube videos that engage your audience. Remember, creating great content takes time and practice. Keep experimenting, learning, and refining your skills, and your YouTube channel will flourish!
Frequently Asked Questions (FAQs) about Recording YouTube Videos
Recording and Copyright
Can I download YouTube videos?
Downloading copyrighted content from YouTube generally violates the platform’s terms of service. There are exceptions for some videos with Creative Commons licenses, but you’ll need to check the specific video’s description for details.
How can I record YouTube videos without watermarks?
Watermarks are typically added by screen recording software itself. If you’re using built-in recording features on your device (PC, Mac, iPhone, Android), they won’t add watermarks. There might be free third-party options that don’t have watermarks, but be cautious of software that seems too good to be true, as it might contain malware. When considering third-party software, focus on reputable brands and be sure to check reviews before downloading.
Recording Specific Content
How can I record live streams on YouTube?
The ability to record live streams depends on the broadcaster’s settings. Some live streams allow viewers to record, while others don’t. You can’t force a recording if the broadcaster has disabled it.
How can I record high-quality gameplay for YouTube?
Many popular options exist for gameplay recording, particularly on PCs. OBS Studio is a free and powerful option for advanced users. Alternatively, some graphics cards come with built-in recording software.
Recording on Mobile Devices
Can I record YouTube videos on my phone or tablet?
Absolutely! Both iPhones and Android devices have built-in screen recording features. Additionally, many third-party apps in the App Store and Google Play Store offer screen recording with a wider range of features.
General Recording Tips
What is the best screen recording software?
The “best” software depends on your needs and budget. Here’s a breakdown to help you choose:
- For beginners: Built-in screen recording features on your device (PC, Mac, iPhone, Android) are a good starting point. They’re simple to use and don’t require additional downloads.
- For more features: Free options like OBS Studio (PC) or AZ Screen Recorder (Android) offer more customization and editing tools.
- For advanced users: Paid software like Camtasia (Mac/PC) or Apowersoft ApowerREC (all devices) provides extensive features for professional-looking recordings.
Remember: Always refer to the software’s documentation or the specific app’s instructions for detailed guidance on using their features.
By exploring these options and following the step-by-step guides provided earlier, you’ll be well on your way to creating high-quality recordings for your YouTube videos!
Conclusion
The choice between built-in tools and third-party software depends on your needs and priorities. If you’re just starting out and want a simple solution, built-in options are a great way to begin. As your YouTube journey progresses and you seek more features and editing capabilities, exploring free or paid third-party software can open up a world of possibilities for creating professional-looking videos.
With the methods outlined in this guide, you’re now equipped to record YouTube videos using various methods on different devices. Remember to experiment with different approaches, find what works best for you, and most importantly, have fun creating engaging content for your YouTube channel!
FAQ
Can I download YouTube videos?
Downloading copyrighted content from YouTube generally violates the platform's terms of service. There are exceptions for some videos with Creative Commons licenses, but you'll need to check the specific video's description for details. #### How can I record YouTube videos without watermarks? Watermarks are typically added by screen recording software itself. If you're using built-in recording features on your device (PC, Mac, iPhone, Android), they won't add watermarks. There might be free thir
How can I record live streams on YouTube?
The ability to record live streams depends on the broadcaster's settings. Some live streams allow viewers to record, while others don't. You can't force a recording if the broadcaster has disabled it. #### How can I record high-quality gameplay for YouTube? Many popular options exist for gameplay recording, particularly on PCs. OBS Studio is a free and powerful option for advanced users. Alternatively, some graphics cards come with built-in recording software.
Can I record YouTube videos on my phone or tablet?
Absolutely! Both iPhones and Android devices have built-in screen recording features. Additionally, many third-party apps in the App Store and Google Play Store offer screen recording with a wider range of features.
What is the best screen recording software?
The "best" software depends on your needs and budget. Here's a breakdown to help you choose: - For beginners: Built-in screen recording features on your device (PC, Mac, iPhone, Android) are a good starting point. They're simple to use and don't require additional downloads. - For more features: Free options like OBS Studio (PC) or AZ Screen Recorder (Android) offer more customization and editing tools. - For advanced users: Paid software like Camtasia (Mac/PC) or Apowersoft ApowerREC (all devic